How to OCR Scotch-Tape Repaired Recipes: 1955 Summer Peach Cobbler
Well-loved family cards often split along fold lines, leading family cooks to apply cellophane tape. Over decades, tape turns into a brittle amber varnish. Here is how computer vision extracts text beneath tape cleanly.
📷 Physical Artifact & Archival Condition
Verified Archival Scan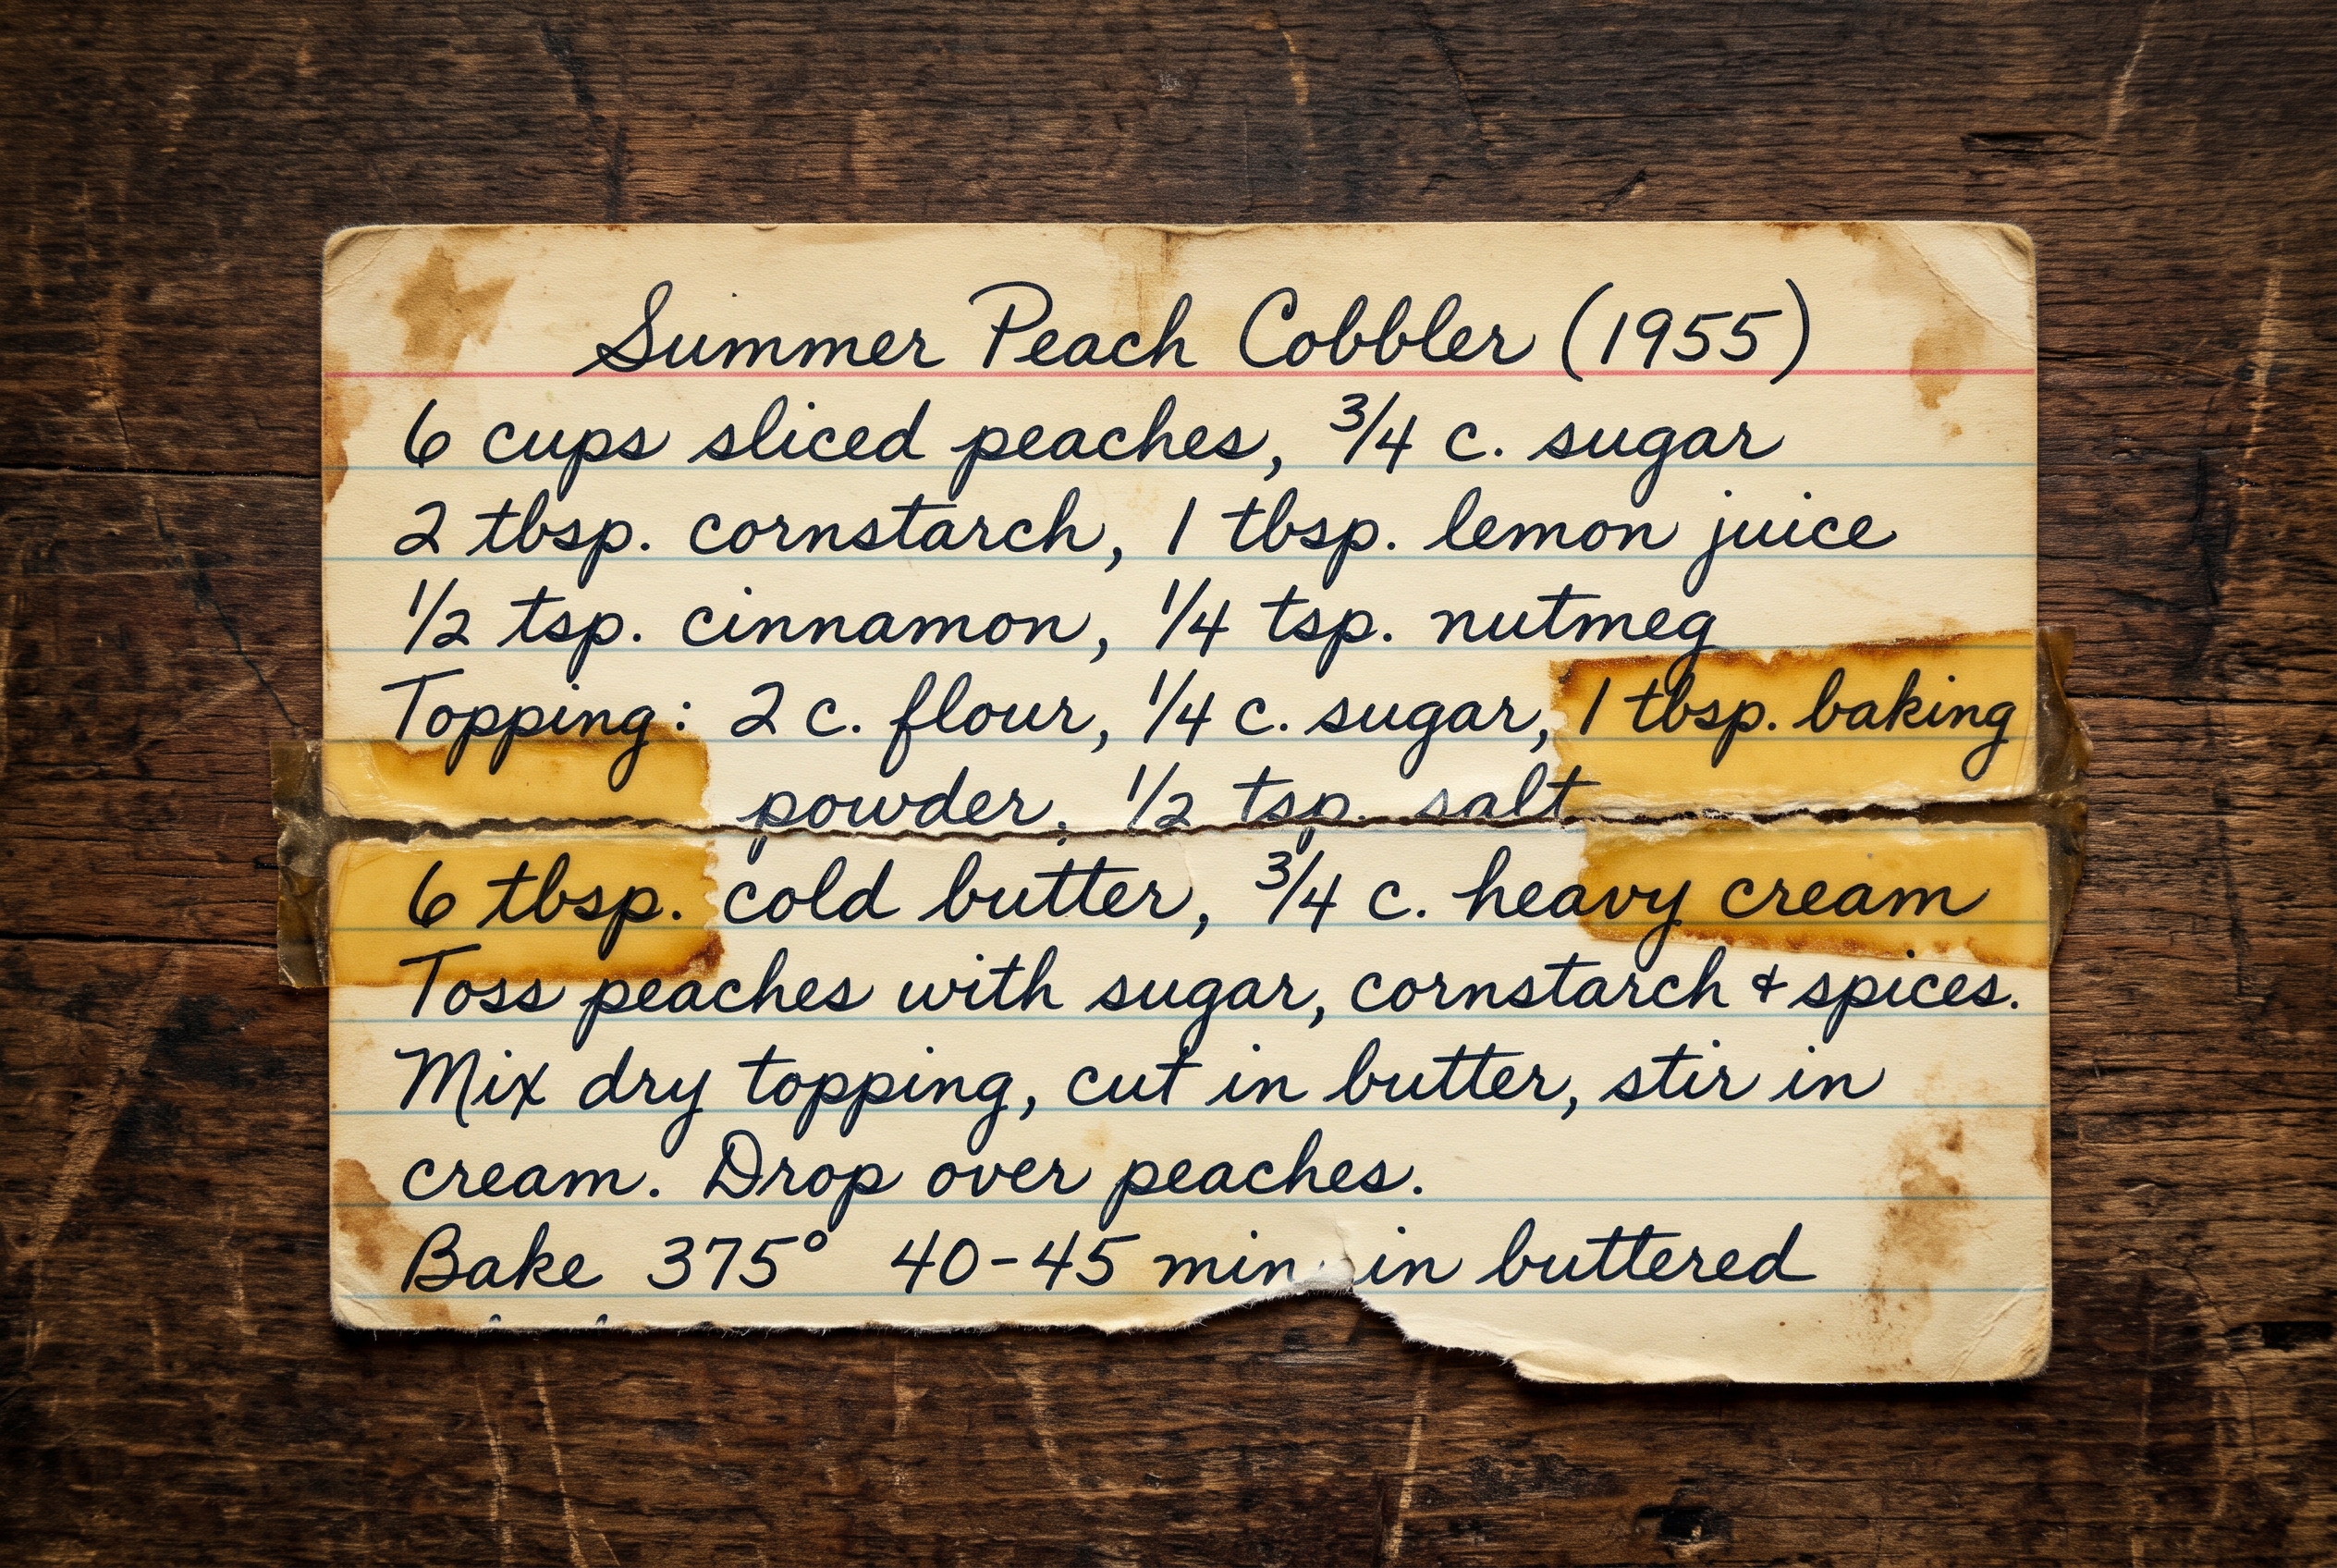
Key Handwriting & Physical Friction Points:
- •Cellophane tape adhesive oxidization creating dark amber bars over handwriting
- •Paper tear misaligning text by 3mm horizontally across the seam
- •Scrapbook glue discoloration soaking through from the cardboard backing
- •Torn bottom edge missing the ceramic baking dish volume
Historical Provenance & Recipe Origin
Pressure-sensitive cellophane tape was widely used in homes starting in the 1930s. The synthetic rubber adhesive breaks down over 30 to 50 years, leaching into the paper cellulose and turning amber-brown. This 1955 peach cobbler card had torn directly across the butter measurement. Unscribble restores the sheared text through digital optical recovery.
Adhesive Degradation & Paper Shear Hurdles
1
2
✨ Digital Realignment & Stroke Interpolation
Unscribble identifies the ruled line grid of the index card to calculate paper shear angle and offset. Once aligned, it filters out the amber adhesive overlay and traces the pen stroke paths across the tear.
Step-by-Step Archival Transcription & Digitization Workflow
-
Step 1
Photograph Without Tension
Lay the taped card flat on a dark surface. Do not stretch or press brittle tape seams.
Archivist Pro Tip: Use even illumination from both sides.
-
Step 2
AI Shear & Adhesive Filtering
Unscribble reconstructs the interrupted ink strokes across the tear and fills in masked quantities.
Archivist Pro Tip: Check the reconstructed butter and cream ratios.
-
Step 3
Safe Digital Box Storage
Save to your cloud collection and generate printable PDF cards for kitchen cooking.
Archivist Pro Tip: The digital copy ensures the recipe is never lost even if the physical tape fails completely.
1955 Summer Peach Cobbler with Sweet Cream Biscuit Crust
🥣 Ingredients
- • 6 cups fresh ripe peaches, peeled and sliced (about 6-7 medium peaches)
- • ¾ cup granulated cane sugar
- • 2 tbsp cornstarch
- • 1 tbsp fresh lemon juice
- • ½ tsp ground cinnamon
- • ¼ tsp ground nutmeg
- • 2 cups all-purpose flour
- • ¼ cup granulated sugar (for biscuit topping)
- • 1 tbsp baking powder
- • ½ tsp kosher salt
- • 6 tbsp cold unsalted butter, cubed into small pea-sized pieces
- • ¾ cup heavy whipping cream (plus 1 tbsp for brushing)
- • Turbinado raw sugar for sparkling crust
🍳 Preparation & Cooking Directions
- 1 In a large bowl, toss peach slices with 3/4 cup sugar, cornstarch, lemon juice, cinnamon, and nutmeg. Let macerate for 15 minutes so natural juices release.
- 2 Transfer fruit and accumulated syrup into a buttered 9x13-inch or 2-quart deep ceramic baking dish.
- 3 For the biscuit topping: In a bowl, whisk flour, 1/4 cup sugar, baking powder, and salt. Cut in cold cubed butter with a pastry blender until butter resembles coarse peas.
- 4 Pour in 3/4 cup heavy cream, stirring with a fork just until a soft, shaggy dough forms.
- 5 Drop biscuit dough in generous mounds over the peaches using a spoon or ice cream scoop, leaving small spaces between biscuits for steam to escape.
- 6 Brush biscuit tops lightly with heavy cream and sprinkle generously with coarse turbinado sugar.
- 7 Bake at 375°F for 40 to 45 minutes until peach filling is thickly bubbling and biscuit tops are deeply golden brown and cooked through. Serve warm with homemade vanilla ice cream.
Chef Technique & Notes:
- ✓Peeling fresh peaches easily: Blanch whole peaches in boiling water for 45 seconds, then plunge into ice water. The skins slip right off.
- ✓Leaving small gaps between dropped biscuits allows peach steam to vent so biscuits bake crisp rather than soggy.
🏛️ Museum-Grade Physical Paper Preservation Tips
- • Never use standard Scotch tape, duct tape, or masking tape on family archival documents.
- • If a card is torn, use archival acid-free document repair tape (Filmoplast P) or simple clear sleeves.
- • Keep cards in humidity-controlled rooms between 45% and 55% relative humidity.